|
HOW TO:
lesson #1: painting a picture in painter. 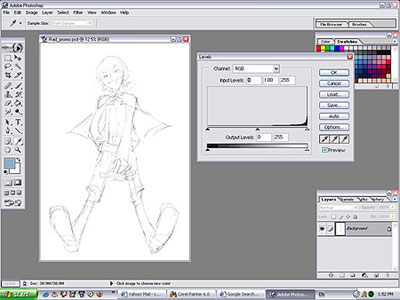 STEP 1 'Adjusting your sketch in Photoshop': The first thing I usually do is draw a very rough sketch in my notebook. It doesn't need to be perfect, as I'm going to paint over it anyway. After scanning my rough thumbnail drawing at 300dpi, I usually convert it to grayscale and then adjust the levels to sharpen the lines. In the end, you're left with a clean sketch. Make sure to erase any spots or streaks that may be floating around in the white space. 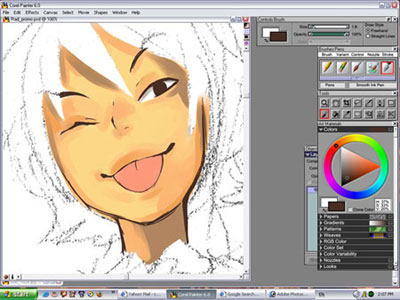 STEP 2 'rough underpainting': Save the image as a psd file, then go to painter. I only use one layer when I'm painting in painter like this. The first thing I do is start with the head, I pick a skin color and start paining the face, careful to avoid completely covering the pencil lines. Then I use the ink pen tool to ink over the pencil lines, and I clean the lines up with the skin color. This is a very rough painting over that I do to just get a feel of how the image is going to look overall. It's like an underpainting. Zooming out to view the image overall helps to judge how you're shading better. 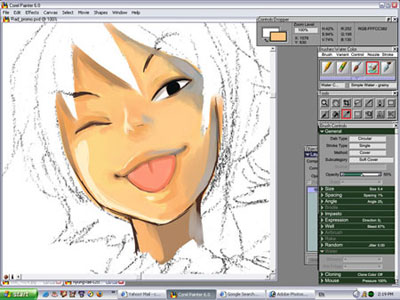 STEP 3 'determining line, light and shadow': At this point, with my underpainting colored, I decide where my light source is and start shading with that in mind, rather than using just shades of black or white to highlight, try using bright blues, yellows and reds, smudging them into other colors to create more vivid shadows and highlights. Of course, deciding on this depends on what sort of lightsource you were planning on using. 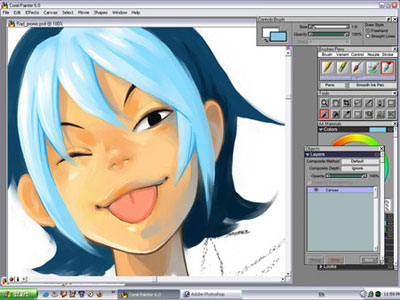 STEP 4 'Adding detail to the face': With shadow determined, you can now go back and touch up the face, which for me, is a very lengthy process of using the eyedropper tool and the paintbrush together. Usually, what I do is have my paintbrush on a low opacity setting, usually 30% or so, and so when I paint, colors below my stroke show through. I then use my eyedrop tool to pick up those colors and shade or highlight with them, as well as use them to smooth out other lines. If you notice, I have changed the look if his face abit, moved the nose around, and smoothed out his features, cleaning up whatever imperfections the rough sketch left behind. 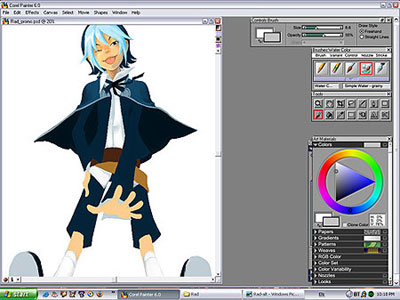 STEP 5 'Underpainting for the body': After I'm pretty satisfied with the face, I go on to paint the body, starting with a underpainthing for all the large areas. If your lines are smooth enough, you can just use the paintbucket tool to fill in the spaces. 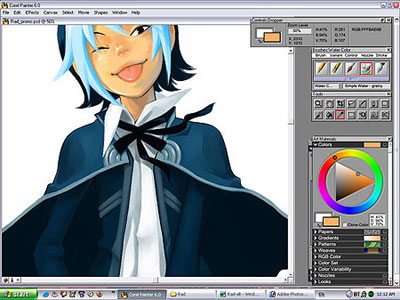 STEP 6 'Adding detail to the body': Then, like in the case of the face, I determing light and shadow, then start adding details to the body, cleaning up any lines and rendering little things like belt buckles or buttons or whatever. After all of this, go back and clean up the image anyway you can, I usually do plenty or tweaking and adjusting before I'm satisfied, and the more you work on this kind of painitng, the better it looks, if you ask me. 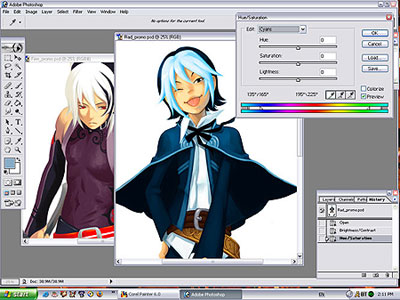 STEP 7 'Finishing touches in Photoshop': When I'm finally satisfied in painter, I save the image, then head back to photoshop, where I can do the final touches. Sometimes I find that my image ends up sort of low-contrast after painting in painter, so I'll adjust the brightness and contrast and the levels abit to make it nice and vivid. Sometimes comparing it to another image helps. In the case of this picture, it was part of a series, so I made sure that it matched the others. |